We asked AI to assess quotes. It confidently made things up.
Mariano Carpentier
June 19, 2017
/
Getting Kubernetes up and running is not a minor achievement, with the absence of an official installer (more on that later) the (too many) cloud vendors and the different topologies of the Kubernetes software itself. Sometimes it feels like going through a mine-field, especially if we divert from the most transited path.
In this post, I will compare the main Kubernetes installers for each major cloud. I will advise and show you some commands on how to install and get Kubernetes running. I don't have the intention of writing detailed instructions but just to give you an idea of what to expect from each installer method.
By the end of this post you will have a better understanding of how to get Kubernetes up and running in the cloud and what are the pros and cons of the different techniques so you can make a decision according to what is available out there.
"I think there is a world market for maybe five computers"
Thomas John Watson Sr. (1874-1956) IBM CEO
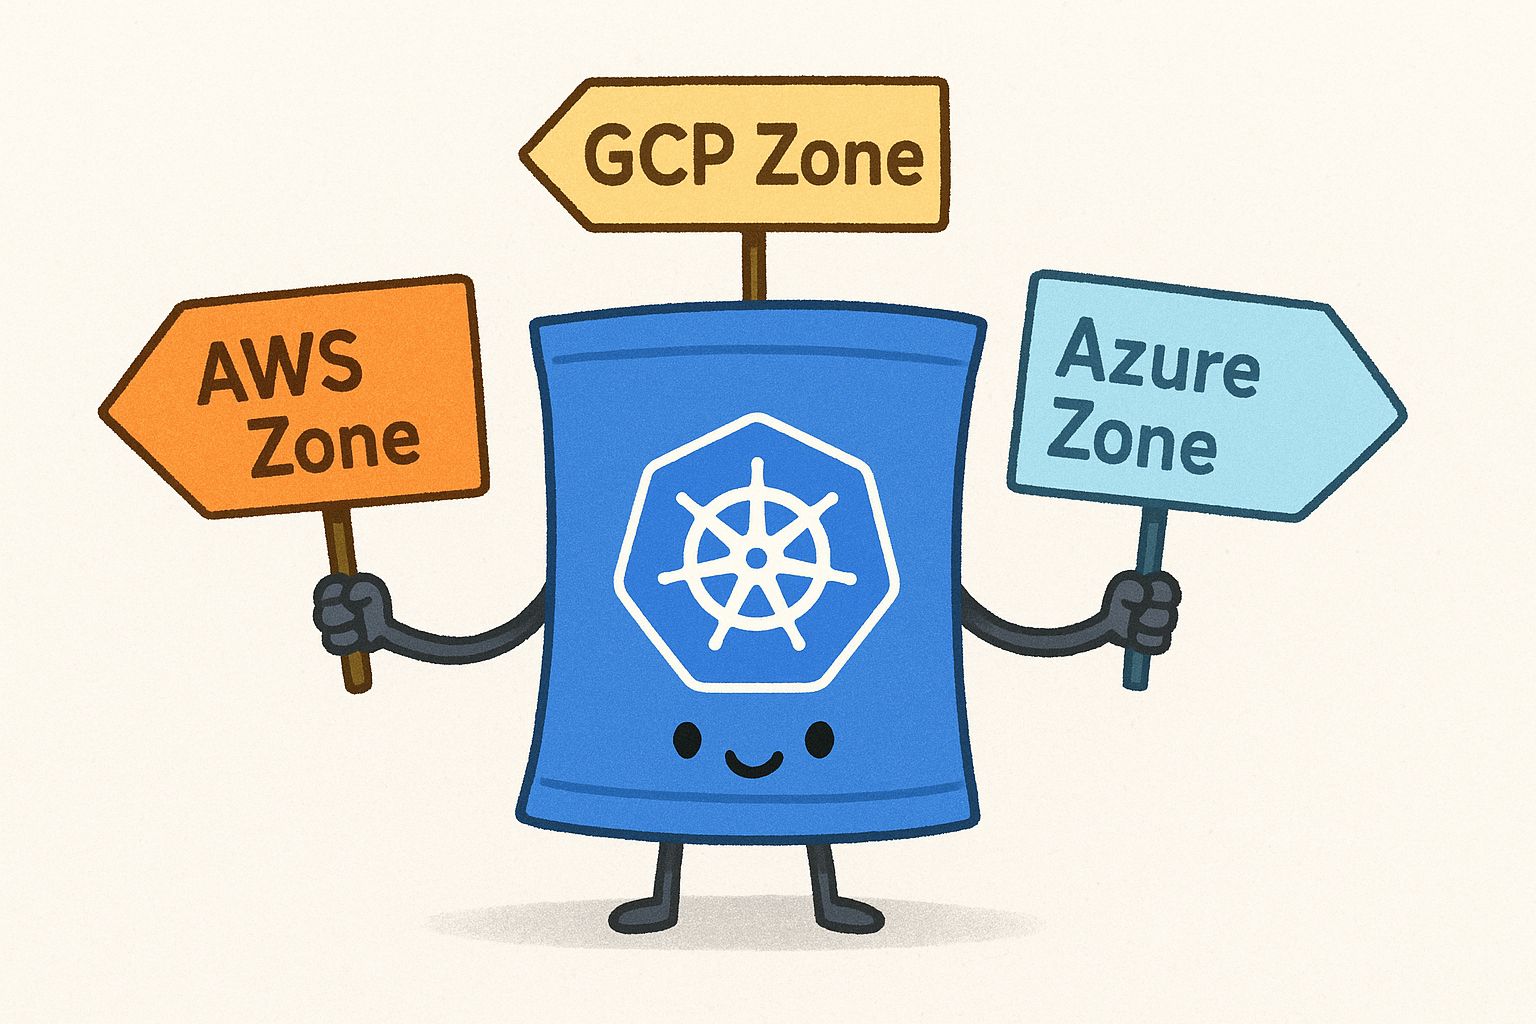
We always thought that quote is utterly wrong, but what if those five computers are only three and they are called AWS, Google Cloud and Microsoft Azure?
Since the beginning of the computers era there was a back and forth between centralised servers and personal computers. At first we had mainframes which people would only have access to through thin terminals that didn't do much more than that. Then we had personal computers which were the size of the old thin terminals but were as powerful or more than the old big mainframes.
Nowadays computers and its applications have gone mainstream and not mainly in the form of desktop or laptop computers but as mobile devices. Powerful but not useful without Internet and the big cloud computers, repeating in this way the old thin terminals and mainframes tale. There are even reports of many special hardware technology (hard disks, network gear, etc.) only available to cloud providers but not to smaller companies or normal users. This makes building your own data centre even less attractive to compete with the cloud.
Should I just use AWS then? What about Azure or Google cloud? What about vendor lock-in? What about the other smaller but faster and cheaper cloud computer vendors like Digital Ocean, Vultr and many others? What about my own data-centre or pc?
Kubernetes mission is to democratise the access to scalable, automated and highly resilient software. This means that your application can be made highly available in any cloud (or your own infrastructure) provided that it fits into one or many containers.
From our experience, Kubernetes can be challenging to set-up but once it is up and running it makes the operation of your applications very smooth. This software is meant to be the operations layer for developers.
Historically we had the Development team in charge of creating software and then the Operations team in charge of the infrastructure and keeping the applications up and running. The problem is that while the infra team has knowledge about, well.. infrastructure... the development team will have a better understanding of how to do operations on the application layer that they created themselves. Kubernetes allows that separation of concerns by providing a framework to run and scale your containerised applications.
Development teams that rely on Kubernetes will benefit from an infrastructure that gives you resiliency and freebies from day zero. What happens if your application stops? Kubernetes will restart it again. What happens if the whole computer where your application runs also goes off? Kubernetes will start your application on a different computer (provided that your cluster has more than one node) In the last example, Kubernetes shifted our container from one machine into another making it available again. The question is now what happens to the URL of the recreated application? It will remain the same! Kubernetes decouples the application from the service name, allowing for a smooth fail-over and even an out of the box load balancing. I could keep going with the list of Kubernetes features but I will mention only one more, Kubernetes enable you to escape from vendor lock-in. You can install it in any cloud and even on your own small laptop PC.
 Image above: An application is down due to AWS being unhappy with the number of api requests... Anybody ready for cloud independence?
"..there is no one true way to set-up Kubernetes.."
Lucas Käldström, Kubernetes maintainer
As mentioned above, before getting Kubernetes up and running we will have to overcome a couple of challenges. Some of them are explained below.
Kubernetes was designed to avoid single points of failure. Which is a blessing, but also a curse when it comes to setting it up. You can imagine that a highly resilient software won't work successfully if it is only installed on a single computer. Therefore it allows us to set it up on a set of masters and nodes computers. While this is good for high availability, it certainly makes the configuration and initial set-up a bit more challenging.
Internally, Kubernetes has a set of distributed components that allow a good division of concerns and high cohesion for each of them. In most cases, we are only left with the challenge of setting up security roles, certificates and firewall rules, in other cases, like the etcd datastore cluster we can even decide how many instance to run and where.
We will repeat our mantra here, it is good to hold the hand of the installer but it is also a great idea to know what it is doing. For example, from the Kubernetes architecture image above, the Etcd datastore cluster has the critical mission of keeping a consistent state of the system. It doesn't matter what instance of etcd we ask to, we can be sure that the answer will be coherent even in the case of concurrent activity. Next is the API Server, which is the only component who talks to Etcd and provides security and information access for other components. The Autoscaler will help scale up or down our application. Finally the Kubelet component runs on every node and also watches the Pods running in that node. Finally, the Pods (not mentioned in the diagram) are where our containers runs.
Coming back to the Kubernetes topography, we may decide to have everything on the same machine (adequate for development) or to have two masters and three nodes, in case we want to add resiliency and some spare capacity to our system. We also have the option to choose how many nodes of the Etcd datastore cluster will be running. Though it is very common to have one per each master. This means we will have to connect the different Kubernetes components depending on our system layout. This will give us a better understanding of the internals, which I recommend doing at least once. Another option is to get an installer that is flexible enough to do all the wiring for us.
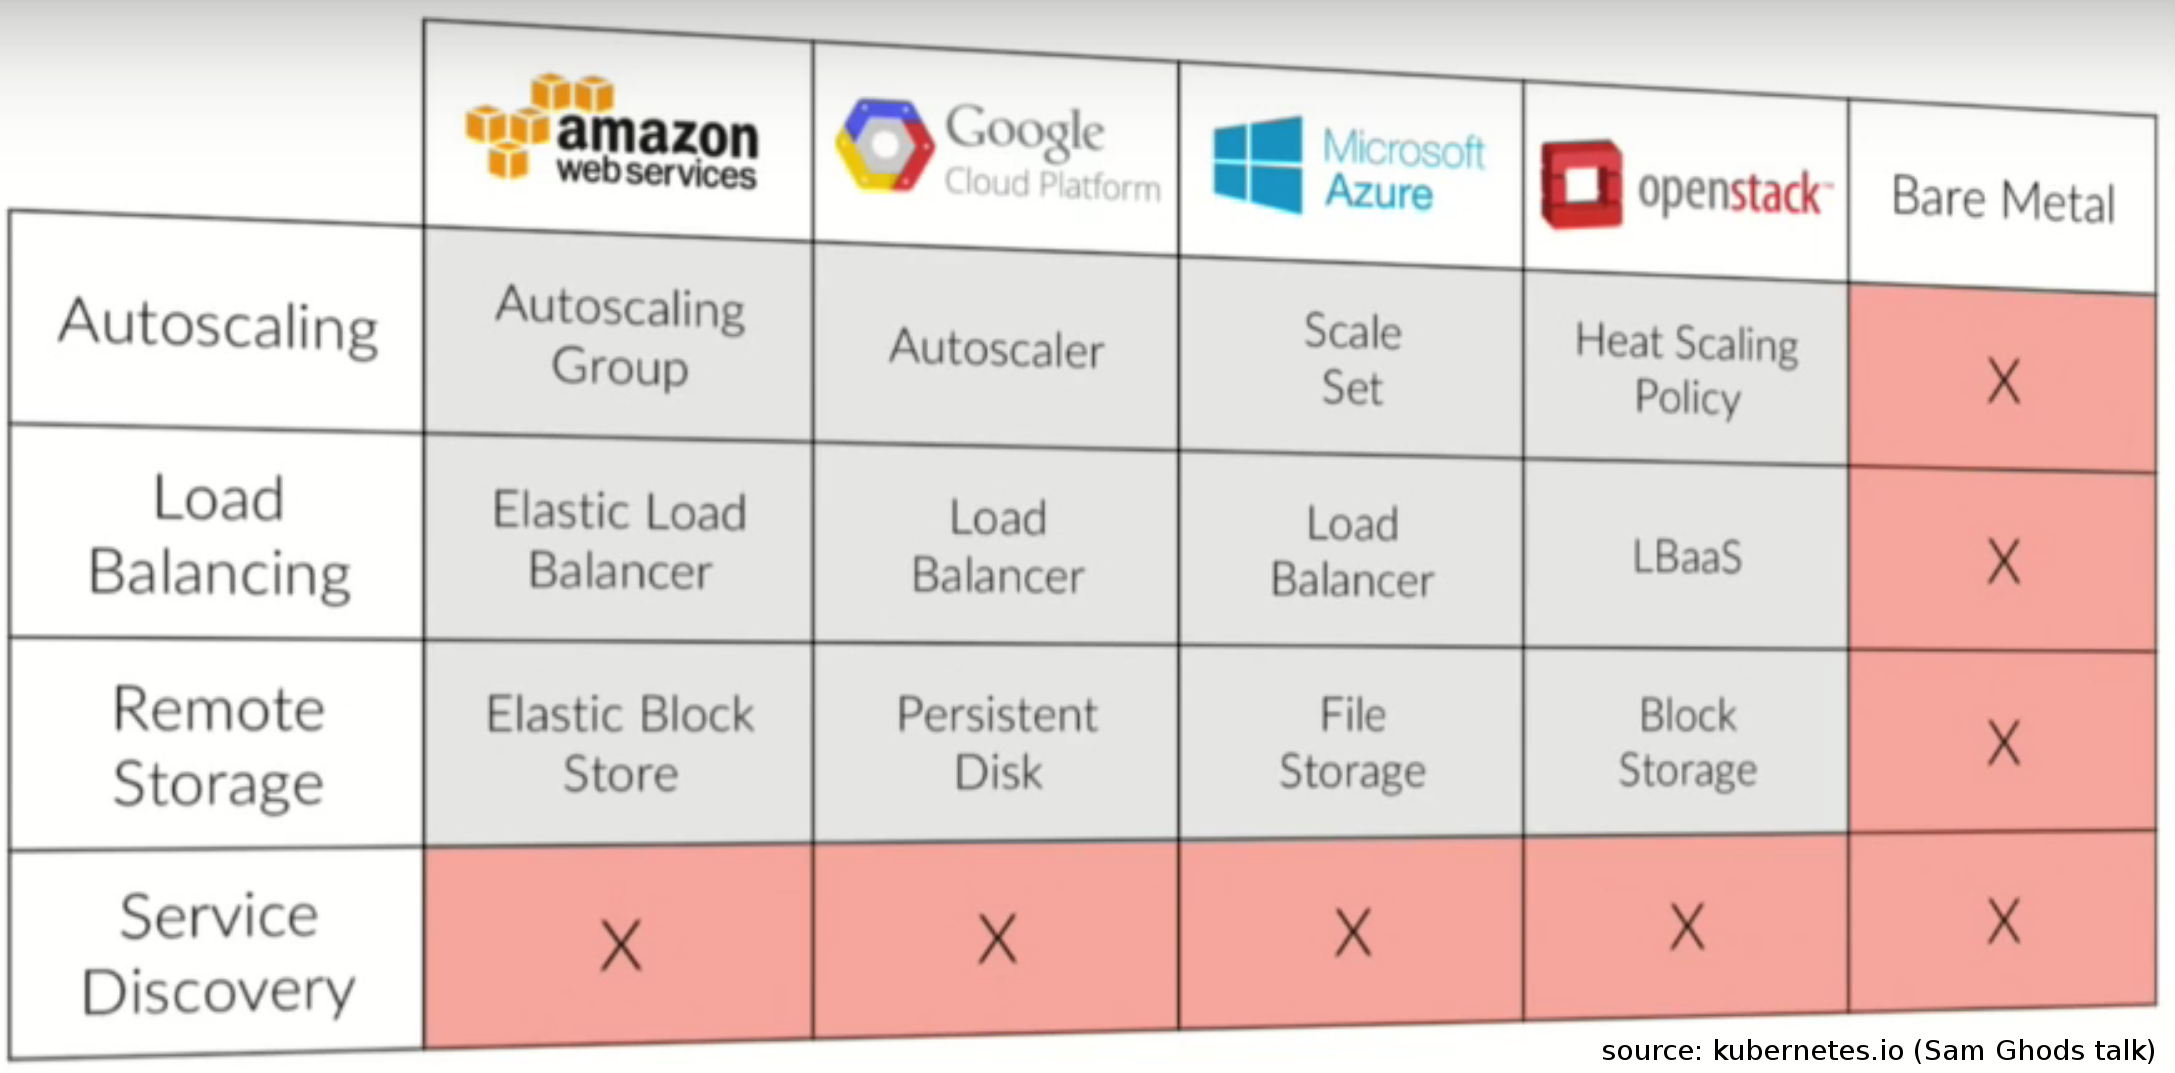
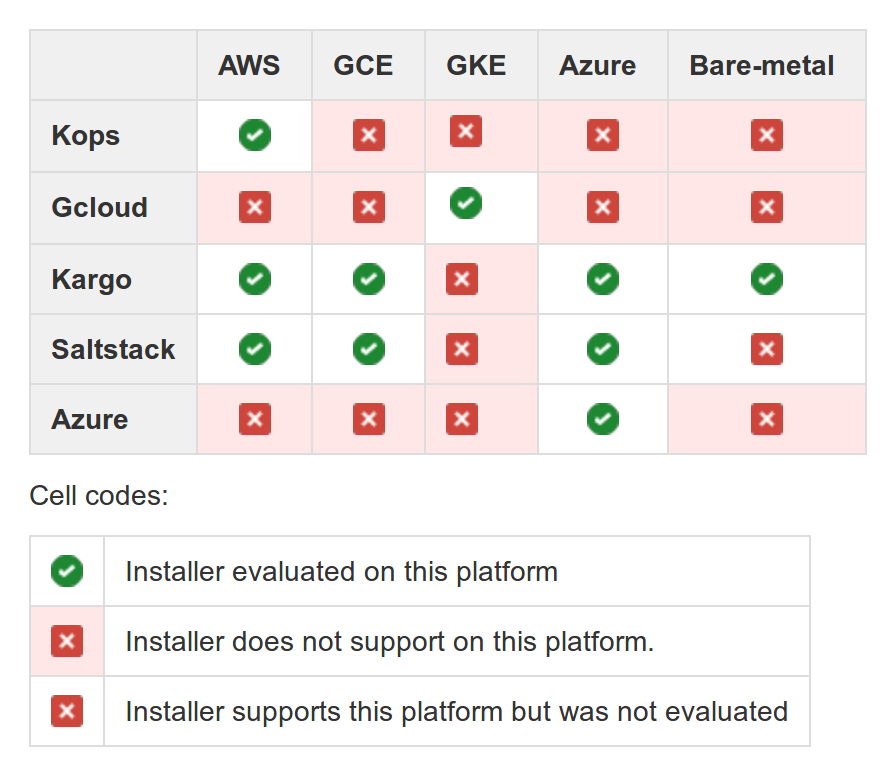
As we can see from the above table, the official Kubernetes site mentions 41 different ways to install it and even some excellent options (like Rancher for example) are not present on the list. These many choices can be overwhelming and clearly point out the complexity of setting up this product.
More eloquently, Lucas Käldström, one of the Kubernetes maintainers, wrote in a blog post that there is no official way to install Kubernetes. The Kubernetes team itself provides kubeadm which is currently in Beta. Then there is a set of installers methods depending on your choice of Operating System and Cloud provider. For your convenience, I analysed the most popular options below and came up with some suggestions.
As I mentioned before, the cloud is becoming the datacenter for many applications and companies in the world. Amazon Web Services in particular is so big that whenever there is an issue on their network you will hear about many apps and web-sites going down (BTW we can avoid this problem with Kubernetes)
The cloud is wonderful. In minutes (or maybe seconds) it allows us to set up as many computing capacity as needed and then also dispose it when it is no longer needed. Gone are those days when to increase capacity we have to wait months to set up racks, servers, networking, the operating system and so on. But the cloud is also risky given that we effectively lose control and get locked into a proprietary system where we have great technology available to scale, load balance and secure but always using proprietary API's that will only work with a particular vendor.
What happens then if we want to use some spare machines in our data centre to test our system? What happens if our vendor increases the price? What happens if for any political reason we can't reach our cloud vendor anymore? What happens if we want to switch to another provider? Can we get it all?
I believe Kubernetes is the answer to all the above questions. We have this great open source framework that can be installed on a Raspberry Pi, our laptop, our company data-centre, a new VPS, an established cloud provider or his cloud provider competitor. Kubernetes gives us many features for free which allow us to deploy seamlessly and have robust up-times. I tried to establish before that Kubernetes is a complex product. In the next few paragraphs I will analyse the best ways to get it up and running.
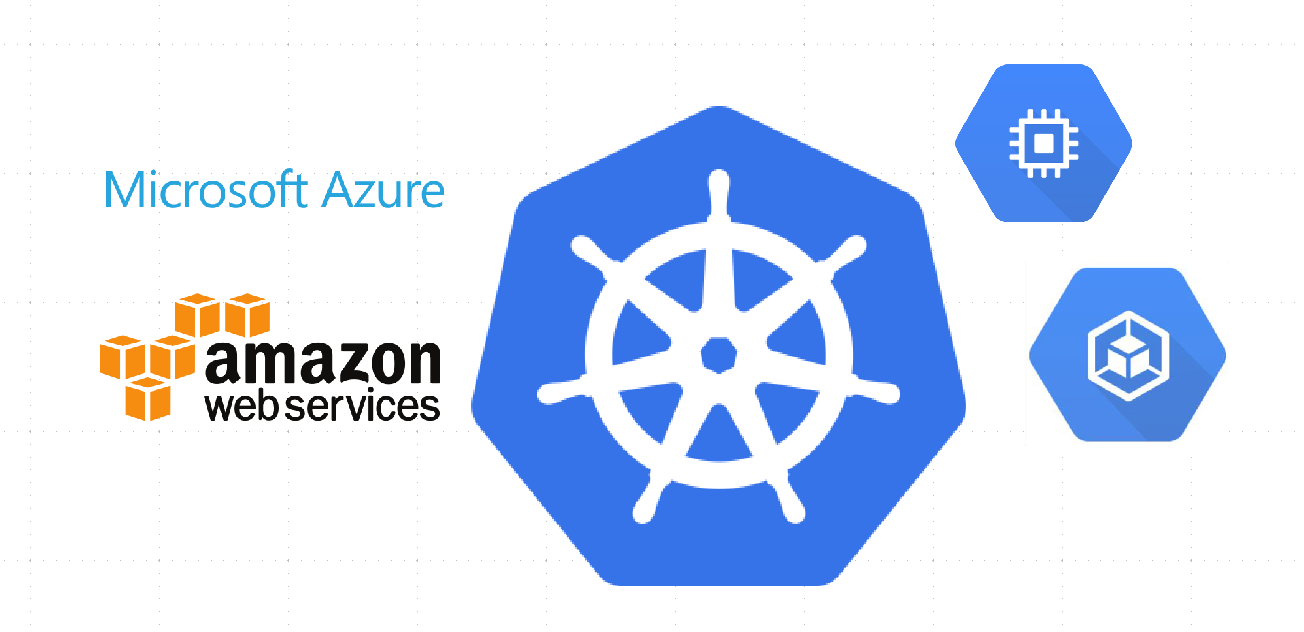
For the purpose of this analysis I evaluated the most popular options to get Kubernetes working in the cloud. In particular I selected the major cloud players and the most mature installation methods, both suggested by the cloud vendors and the Kubernetes team themselves.
I selected the major cloud providers, AWS, Microsoft Azure, Google Compute Engine (GCE or Google's virtual private servers) and Google Container Engine (GKE, a platform for deploying containers in the cloud)
The installers I used were either the most mature for a particular platform (Kops), the only choice for a particular cloud (GCloud, Az tool) or a major multi-cloud installer like Kubespray or Saltstack. For the purpose of this post I won't analyse OS specific tools like Juju and Tectonic installers or beta tools like Kubeadm.
On the examples below, I will provision a basic cluster (usually one master and two nodes) following the instructions of the installer. I will then summarise the following information:

Kops, or Kubernetes Operations is a command line tool to provision a Kubernetes cluster on AWS. Currently it only works with AWS using Debian or Ubuntu but it plans to add support for more cloud providers and operating systems.
It is true that 'Kubernetes Operations' or kops doesn't support many cloud or OS platforms but it makes up for this with a superb work on the scope of the tool. Out of the box provides a fully automated installation with high availability options. It even generates an optional Terraform configuration which is a big plus when it comes to understanding what exactly is going to happen or eventually to make Kubernetes collaborate with our own infrastructure.
This is the list of pre-requisites to use Kops:
For a full description and detailed instruction please visit: this link
Once we set-up our kops environment this is how we create a multizone Kubernetes cluster with three masters (minimum for multizone) and two nodes.
kops create cluster --zones=us-west-2a,us-west-2b,us-west-2c --master-zones=us-west-2a us-west-2a.demo.kubernetes-training.com --master-count 3 --node-count 2
We can specify any number of nodes or masters starting from at least one. If we specify the master-zones parameter then we need to specify at least three zones with one master per zone. This is due to the way the etcd server works. It needs 51%+ availability of the nodes to provide a consistent answer.
The 'create cluster' command will only create a set of configuration files locally. It won't create any resource in the cloud. To actually execute your configuration you need to run this command:
kops update cluster [clusterName]
AWS (or other cloud providers) offer their services in different geographical regions. US East, US west, Sydney, Singapore, etc. Within each region you will have different zones, usually named with letters (like 'a', 'b', 'c') This gives us many opportunities to avoid failures.
While regions are completely isolated from each other, this means that a failure in one region won't affect the next one, the latency among them is high. Zones, on the other hand, have low latency against each other and provide a good (but not complete) failure isolation. When there is a failure, it will rarely affect multiple zones and even less likely for it to affect the whole region. This is why getting a Kubernetes cluster distributed among multiple zones will dramatically improve the availability of your system.
As we shown in the above command, it is very easy to get a multizone Kubernetes cluster with kops, something that is definitely not given by other installers. Noteworthy, we just need to remove the multizone options if we want a simple and smaller cluster.
Finally, regarding High Availability, both nodes and masters are part of an auto scaling group. This means that the machines get automatically restored if they get shut-down for any reason.
At the time of writing this post I got the following Kubernetes and OS versions:
OS: Debian 8.6

Kernel: 4.4.41-k8s

Kubernetes: 1.5.2
kops provides the kops edit cluster and kops update cluster commands that allows us to modify and update our system.
Just a few minutes. After setting up your credentials and command line client everything just works.
kops is a free tool. We just have to pay the standard AWS resources. To give a reference, for a three masters and two nodes cluster, the price would be $(USD)215 monthly. This does not include S3, EBS storage, router 53 DNS names or network traffic prices. You can check our pricing model here: http://calculator.s3.amazonaws.com/index.html#r=IAD&s;=EC2&key;=calc-FEEF41C0-1714-4B05-8C32-3355E81EAABA
Using kops is certainly a pleasant experience where everything just works. They even added experimental support for federation which is still in beta within the Kubernetes project.
Kubernetes is actually the open source version of Borg. With more than 10 years in production (way more than the whole history of Docker), Borg helped Google to manage and orchestrate their massive infrastructure using containers and virtualization technology. Therefore, it is not surprising that Google has not only the ability to run Kubernetes but also offers a managed Kubernetes solution that customers can use to run their own applications.
GKE promises the ability to get a one-click Kubernetes clusters and for the most part this is truth. Although I didn't really tried the UI but rather the command line to not miss out on automation details, I found out that activating some API's and the extra commands to enable authentication is either manual, very slow or not compatible with a well automated interaction.
To deploy our managed Kubernetes in GKE you will need to follow the steps below. For more details you can visit: https://cloud.google.com/container-engine/
Once we are done with the pre-requisites, we can get three nodes with a 'managed' master hosted on GCE by running the following commands:
gcloud config set compute/zone us-central1-b
gcloud config list
gcloud container clusters create example-cluster
To get an example application running we can run:
gcloud auth application-default login
kubectl run hello-node --image=gcr.io/google-samples/node-hello:1.0 --port=8080
kubectl expose deployment hello-node --type="LoadBalancer"
kubectl get service hello-node
By adding a few parameters and some extra nodes we can take advantage of Google network multi-zone capabilities. Please notice that we can only specify the nodes in GKE. Since this is a managed GKE Kubernetes cluster the master/s are not under our control. I guess it is a good thing if we decide to use GKE after all but personally I would feel uneasy though.
From the GKE documentation:
The following commands create a cluster of size 5 in one zone then update it to replicate the node footprint across 3 zones. After the second command has finished, the cluster will have 15 nodes total (five in the default zone, five in each of the additional zones).
gcloud container clusters create NAME --zone us-central1-b --num-nodes=5
gcloud beta container clusters update NAME --additional-zones=us-central1-f,us-central1-c
In addition, regarding HA, the instances are part of an instance group. They come back some seconds after being shut-down.
Even the OS in use is a special Google optimized OS for containers. OS: Container-Optimized OS from Google Kernel: 4.4.21+ Kubernetes: 1.5.6
After you have finish setting up your Kubernetes cluster, GKE offers support to execute some typical operations like upgrading, shrinking or resizing your cluster. For more information you can check: https://cloud.google.com/container-engine/docs/how-to https://cloud.google.com/container-engine/docs/resize-cluster
The GKE cloud installation took around 10 minutes for a basic set-up. Though, it was a longer time for executing more complicated commands and understanding the GKE architecture.
A three nodes machine costs $177.52. This does not include network traffic, load balancer, disk usage or any other cost. This is a bit cheaper than the $215 AWS price for a similar set-up. Part of the cost advantage is the lack of a traditional master. For more pricing information please visit: https://cloud.google.com/pricing/calculators
It was relatively easy to get the Kubernetes GKE cluster up and running. It took only a few minutes, and the security looks to be strong out of the box. On the other hand, there are lots of magic happening with the gcloud tool and under the GCE cloud hood. The lack of a traditional master could be a limiting factor for some people who want to have more control or even customise their cluster.
 /
/
Kubespray is a command line tool to provision a Kubernetes cluster. This is probably the most flexible and customisable tool. It supports the major cloud providers AWS, GCE, OpenStack, Azure and bare metal. Regarding the operating systems, you can use CoreOS, Debian Jessie (a favourite when it comes to Kubernetes clusters), Ubuntu 16.04 and CentOS/RHEL 7. It also lets you specify the network plugin, Docker options and even the versions of the different components like Calico, Docker, Etcd and so on.
The price for such wide support is a less straightforward experience and a few bugs along the way. With Kubespray we certainly don't have a specialised tool but rather one that tries to help us out with any of our weird requirements.
These are the requirements for setting up a cluster in AWS and GCE with Kubespray:
Just for reference, this is how we can set up our kubespray client with virtualenv and pip:
	git clone [email protected]:darumatic/docker.git
	docker build -t kubespray:1 docker/kubespray/
	docker run -v ~/.ssh/:/root/.ssh/ -v ~/.aws/:/root/.aws/ -it kubespray:0 bash
	kubespray aws --masters 1 --nodes 2
	kubespray deploy --aws --redhat -u centos
The first step is to create the VMs needed for the cluster. When creating the VMs, kubespray will also create an Ansible inventory file which will be used during the second step.
By the time of writing this post, if you are using AWS you need to create beforehand a security group with ssh access and a VPC subnet. The security group will allow ssh access and also enable traffic between the EC2 instances. The ssh access is required by Ansible to set-up Kubernetes in the cluster while the traffic between instance is necessary for Kubernetes to coordinate the different components when it is running. Update: From kubespray 0.4.9 creating a VPC does not seem to be necessary anymore.
To provision a cluster we run:
kubespray aws --nodes 3 --masters 1
kubespray gce --nodes 3 --masters 1
Depending on whether we are using the AWS or GCE clouds.
Afterwards we deploy the Kubernetes cluster:
kubespray deploy --aws --redhat -u centos
kubespray deploy --gce --redhat -u centos
The commands above will generate three virtual machines with the following configuration:
VM1 and VM2:
    Master components
    Etcd
    Node

VM3:
    Node
    Etcd
    Local nginx proxy for kube-apiserver
The master and node components are deployed using the hyperkube container image and monitored by the kubelet process.
There is no support for multizone but instead kubespray gives support for high availability in two areas, the etcd cluster and the api server.
Regarding the etcd cluster, we get by default one instance on each node. The clients will load balance their requests to etcd using the variable etcd_access_endpoint. In the case of the api server, kubespray sets up a local internal load balancer to add resiliency should we lose a node.
For more information on the kubespray HA features, you can check this page: https://github.com/kubernetes-incubator/kubespray/blob/master/docs/ha-mode.md
As mentioned before, kubespray supports many operating systems and components versions. Just for reference, in our Ubuntu based installation I ended up with the following versions:
Kubernetes: 1.6.1
OS: Ubuntu 16.04 LS
Kernel: 4.4.0-1013-aws
Docker: v1.12.5
Etcd: v3.0.17
kubespray only supports adding new nodes but gives no room to remove them. This last feature is in their roadmap though.
According to our experience, apart from setting up the pre-requirements and tools you will need to assign about one working day to get your Kubernetes cluster running.
kubespray is a free open source tool. The money we spend in our cluster will depend on our choice of cloud or bare metal hardware.
It's great that kubespray gives us so many choices when it comes to platforms, versions and components. Since the configuration generated is an Ansible playbook, we can eventually hack it ourselves to inspect it or adapt it to different needs. Actually, I suspect that the Openshift installer from Redhat is also based on this tool.
Besides the so many options that kubespray provides we believe that the tool could be a bit more polished when it comes to its documentation or the many configuration issues / bugs that come along the way.
![]()
Many years ago, Microsoft lost the Internet train due to first being very late to the party (it competed against the Internet with a closed private network) and then not showing much interest on it when it left its dominant IE6 browser to rest (almost) forever.
Now with a new leadership and a different strategy is going all in towards the cloud, Linux and the world of containers. Proof of it is the support of the Linux Bash in Windows, hiring Brendan Burns (one of the Kubernetes creator) buying Deis (the creators of the Kubernetes applications installer, Helm) and a large etc.
In particular, Microsoft Azure offers a container engine that supports the creation of Kubernetes clusters, DC/OS and Swarm.
As we will soon discover, the whole experience of setting up Kubernetes in Azure will be intuitive and frankly, quite pleasant.
To get started you will need to set-up an Azure account. At the moment of writing this post there are free trials for $USD 200.
In addition, you will need to download the az tool. Surprisingly, this tool works in Linux so forget about dual booting or setting up a virtual machine like with your video games.
For more information and detailed steps please check the following link: https://docs.microsoft.com/en-us/azure/container-service/container-service-kubernetes-walkthrough
Azure keeps your infrastructure elements into what is called resource groups. Naturally, to start the creation of a Kubernetes cluster you need to get a resource group first. We can get one by running the following command:
az group create --name=$RESOURCE_GROUP --location=$LOCATION
After we have our resource, we can create our cluster with this simple command:
az acs create --orchestrator-type=kubernetes --resource-group $RESOURCE_GROUP --name=$CLUSTER_NAME --dns-prefix=$DNS_PREFIX --generate-ssh-keys
The command above will create a Kubernetes cluster in the previous Azure resource group published with the specified domain name prefix. A few minutes later, after our cluster is up and running we can interact with it using these commands:
#To connect to the cluster and deploy an app:
sudo az acs kubernetes install-cli

az acs kubernetes get-credentials --resource-group=$RESOURCE_GROUP --name=$CLUSTER_NAME

#install and run Nginx
kubectl run nginx --image nginx
#Verify that Nginx is running
kubectl get pods

#expose Nginx service
kubectl expose deployments nginx --port=80 --type=LoadBalancer

#to access the Kubernetes dashboard
kubectl proxy
There is no mention or special option for high availability in the Azure documentation so we are left with what what Kubernetes provides by default. As a matter of fact Azure does not support the concept of multi-zones, therefore it limits the HA options for any application deployed into this cloud.
As at the time of writing this post, the az tool installs the following versions when setting up Kubernetes on the Azure cloud:
After installing our Kubernetes cluster, Azure allows us to modify the number of nodes. For example the command below changes the number of nodes to four.
az acs scale -g acsrg1 -n acs-cluster --new-agent-count 4
For more information please visit: https://docs.microsoft.com/en-us/azure/container-service/container-service-create-acs-cluster-cli
The az installer is indeed very convenient and easy to use. After setting up our account and downloading the client (also very simple) we could get a cluster up and running in a few minutes.
One master and one node with the default options would give us two D2 machines with two cores and 7GB of memory. Certainly a bit bigger than the default ones of Amazon or GCE, but I preferred leaving the default size as set-up by the cloud installer. az in this case.
The estimated price, is $USD 276 with the default options for 1 master and 1 node.
As mentioned earlier, I was surprised with how user friendly and easy to use Azure is with the az tool. It's certainly better than the Google cloud experience (both GCE and GKE) and just a little more straightforward than kops
Unfortunately, Azure does not have the maturity or features that AWS or Google cloud have. The lack of zones within regions is a big discouragement to me. Lastly, I believe is great to have this option available in case we want to try federation or just moving some Kubernetes workloads at a convenient time.
The Saltstack installer doesn't qualify as a simplified turnkey solution. Even the official documentation tries to warn you and send you somewhere else on their first paragraph. Nevertheless it does look cool to say: "install Kubernetes by running 'curl -sS https://get.k8s.io | bash' and you are done" Which is definitely not just the only command you need to run. In reality there will be a few more with some hurdles to pass through.
This installer is distributed with the main Kubernetes project and it also supports other clouds like AWS, Openstack and even VMWare. For more information on how to get Kubernetes with the Saltstack on GCE please visit: https://kubernetes.io/docs/getting-started-guides/gce/
From the above mentioned link, here is the list of pre-requisites before you start installing Kubernetes:
Once you are finish with the long procedures above, life smiles at you and suddenly you can provision a new Kubernetes cluster by running:
curl -sS https://get.k8s.io | bashIf everything goes well, the command above will generate one master and three nodes. For additional options you can modify the following file:
⟨kubernetes⟩/cluster/gce/config-default.shThis is the output we got while provisioning a new cluster with the command above. Since this installation method could be tricky, I pasted so you can compare it with your own:
adrian@adrian-ubuntu-XPS:~$ curl -sS https://get.k8s.io | bash
'kubernetes' directory already exist. Should we skip download step and start to create cluster based on it? [Y]/n
Skipping download step.
Creating a kubernetes on gce...
... Starting cluster in us-central1-b using provider gce
... calling verify-prereqs
... calling verify-kube-binaries
... calling kube-up
Project: daru-165901
Zone: us-central1-b

+++ Staging server tars to Google Storage: gs://kubernetes-staging-b56b19fb8b/kubernetes-devel
+++ kubernetes-server-linux-amd64.tar.gz uploaded (sha1 = b02937bbb35b74eb3db401c2a1d791bcfff18e4a)
+++ kubernetes-salt.tar.gz uploaded (sha1 = ccb771736da591a13cd418dd5080f5ec0083aaba)
+++ kubernetes-manifests.tar.gz uploaded (sha1 = ae784d7f8d9fff89e4657a0f714873015acdd508)
INSTANCE_GROUPS=
NODE_NAMES=
Looking for already existing resources
Starting master and configuring firewalls
Created [https://www.googleapis.com/compute/v1/projects/daru-165901/zones/us-central1-b/disks/kubernetes-master-pd].
NAME                  ZONE           SIZE_GB  TYPE    STATUS
kubernetes-master-pd  us-central1-b  20       pd-ssd  READY

New disks are unformatted. You must format and mount a disk before it
can be used. You can find instructions on how to do this at:

https://cloud.google.com/compute/docs/disks/add-persistent-disk#formatting

Created [https://www.googleapis.com/compute/v1/projects/daru-165901/global/firewalls/kubernetes-default-internal-master].
NAME                                NETWORK  SRC_RANGES  RULES                                       SRC_TAGS  TARGET_TAGS
kubernetes-default-internal-master  default  10.0.0.0/8  tcp:1-2379,tcp:2382-65535,udp:1-65535,icmp            kubernetes-master
Created [https://www.googleapis.com/compute/v1/projects/daru-165901/global/firewalls/default-default-ssh].
Created [https://www.googleapis.com/compute/v1/projects/daru-165901/global/firewalls/kubernetes-master-https].
NAME                 NETWORK  SRC_RANGES  RULES   SRC_TAGS  TARGET_TAGS
default-default-ssh  default  0.0.0.0/0   tcp:22
NAME                     NETWORK  SRC_RANGES  RULES    SRC_TAGS  TARGET_TAGS
kubernetes-master-https  default  0.0.0.0/0   tcp:443            kubernetes-master
Created [https://www.googleapis.com/compute/v1/projects/daru-165901/global/firewalls/kubernetes-default-internal-node].
NAME                              NETWORK  SRC_RANGES  RULES                         SRC_TAGS  TARGET_TAGS
kubernetes-default-internal-node  default  10.0.0.0/8  tcp:1-65535,udp:1-65535,icmp            kubernetes-minion
Created [https://www.googleapis.com/compute/v1/projects/daru-165901/regions/us-central1/addresses/kubernetes-master-ip].
Generating certs for alternate-names: IP:104.154.186.102,IP:10.0.0.1,DNS:kubernetes,DNS:kubernetes.default,DNS:kubernetes.default.svc,DNS:kubernetes.default.svc.cluster.local,DNS:kubernetes-master
Created [https://www.googleapis.com/compute/v1/projects/daru-165901/global/firewalls/kubernetes-master-etcd].
NAME                    NETWORK  SRC_RANGES  RULES              SRC_TAGS           TARGET_TAGS
kubernetes-master-etcd  default              tcp:2380,tcp:2381  kubernetes-master  kubernetes-master
/tmp/kubernetes.Pxwbxk/cfssl ~/kubernetes
~/kubernetes
/tmp/kubernetes.Pxwbxk/cfssl ~/kubernetes
2017/04/27 18:27:56 [INFO] generating a new CA key and certificate from CSR
2017/04/27 18:27:56 [INFO] generate received request
2017/04/27 18:27:56 [INFO] received CSR
2017/04/27 18:27:56 [INFO] generating key: ecdsa-256
2017/04/27 18:27:56 [INFO] encoded CSR
2017/04/27 18:27:56 [INFO] signed certificate with serial number 520704780458529781922843315555802149160695038096
2017/04/27 18:27:56 [INFO] generate received request
2017/04/27 18:27:56 [INFO] received CSR
2017/04/27 18:27:56 [INFO] generating key: ecdsa-256
2017/04/27 18:27:56 [INFO] encoded CSR
2017/04/27 18:27:56 [INFO] signed certificate with serial number 437920261618242435212174280245109519378781356846
~/kubernetes
+++ Logging using Fluentd to gcp
WARNING: You have selected a disk size of under [200GB]. This may result in poor I/O performance. For more information, see: https://developers.google.com/compute/docs/disks#pdperformance.
Created [https://www.googleapis.com/compute/v1/projects/daru-165901/global/firewalls/kubernetes-minion-all].
NAME                   NETWORK  SRC_RANGES     RULES                     SRC_TAGS  TARGET_TAGS
kubernetes-minion-all  default  10.244.0.0/14  tcp,udp,icmp,esp,ah,sctp            kubernetes-minion
Created [https://www.googleapis.com/compute/v1/projects/daru-165901/zones/us-central1-b/instances/kubernetes-master].
NAME               ZONE           MACHINE_TYPE   PREEMPTIBLE  INTERNAL_IP  EXTERNAL_IP      STATUS
kubernetes-master  us-central1-b  n1-standard-1               10.128.0.2   104.154.186.102  RUNNING
Creating minions.
Attempt 1 to create kubernetes-minion-template
WARNING: You have selected a disk size of under [200GB]. This may result in poor I/O performance. For more information, see: https://developers.google.com/compute/docs/disks#pdperformance.
Created [https://www.googleapis.com/compute/v1/projects/daru-165901/global/instanceTemplates/kubernetes-minion-template].
NAME                        MACHINE_TYPE   PREEMPTIBLE  CREATION_TIMESTAMP
kubernetes-minion-template  n1-standard-2               2017-04-27T01:28:34.117-07:00
Created [https://www.googleapis.com/compute/v1/projects/daru-165901/zones/us-central1-b/instanceGroupManagers/kubernetes-minion-group].
NAME                     LOCATION       SCOPE  BASE_INSTANCE_NAME       SIZE  TARGET_SIZE  INSTANCE_TEMPLATE           AUTOSCALED
kubernetes-minion-group  us-central1-b  zone   kubernetes-minion-group  0     3            kubernetes-minion-template  no
Waiting for group to become stable, current operations: creating: 3
Waiting for group to become stable, current operations: creating: 3
Waiting for group to become stable, current operations: creating: 2
Group is stable
INSTANCE_GROUPS=kubernetes-minion-group
NODE_NAMES=kubernetes-minion-group-9tmc kubernetes-minion-group-jrtp kubernetes-minion-group-rw7k
Trying to find master named 'kubernetes-master'
Looking for address 'kubernetes-master-ip'
Using master: kubernetes-master (external IP: 104.154.186.102)
Waiting up to 300 seconds for cluster initialization.

  This will continually check to see if the API for kubernetes is reachable.
  This may time out if there was some uncaught error during start up.

..............Kubernetes cluster created.
Cluster "daru-165901_kubernetes" set.
User "daru-165901_kubernetes" set.
Context "daru-165901_kubernetes" set.
Switched to context "daru-165901_kubernetes".
User "daru-165901_kubernetes-basic-auth" set.
Wrote config for daru-165901_kubernetes to /home/adrian/.kube/config

Kubernetes cluster is running.  The master is running at:

  https://104.154.186.102

The user name and password to use is located in /home/adrian/.kube/config.

... calling validate-cluster
Validating gce cluster, MULTIZONE=
Project: daru-165901
Zone: us-central1-b
Waiting for 4 ready nodes. 0 ready nodes, 1 registered. Retrying.
Waiting for 4 ready nodes. 0 ready nodes, 1 registered. Retrying.
Waiting for 4 ready nodes. 1 ready nodes, 4 registered. Retrying.
Found 4 node(s).
NAME                           STATUS                     AGE       VERSION
kubernetes-master              Ready,SchedulingDisabled   59s       v1.6.2
kubernetes-minion-group-9tmc   Ready                      30s       v1.6.2
kubernetes-minion-group-jrtp   Ready                      31s       v1.6.2
kubernetes-minion-group-rw7k   Ready                      26s       v1.6.2
Validate output:
NAME                 STATUS    MESSAGE              ERROR
scheduler            Healthy   ok
controller-manager   Healthy   ok
etcd-1               Healthy   {"health": "true"}
etcd-0               Healthy   {"health": "true"}
Cluster validation succeeded
Done, listing cluster services:

Kubernetes master is running at https://104.154.186.102
GLBCDefaultBackend is running at https://104.154.186.102/api/v1/proxy/namespaces/kube-system/services/default-http-backend
Heapster is running at https://104.154.186.102/api/v1/proxy/namespaces/kube-system/services/heapster
KubeDNS is running at https://104.154.186.102/api/v1/proxy/namespaces/kube-system/services/kube-dns
kubernetes-dashboard is running at https://104.154.186.102/api/v1/proxy/namespaces/kube-system/services/kubernetes-dashboard
Grafana is running at https://104.154.186.102/api/v1/proxy/namespaces/kube-system/services/monitoring-grafana
InfluxDB is running at https://104.154.186.102/api/v1/proxy/namespaces/kube-system/services/monitoring-influxdb

To further debug and diagnose cluster problems, use 'kubectl cluster-info dump'.

Kubernetes binaries at /home/adrian/kubernetes/cluster/
You may want to add this directory to your PATH in $HOME/.profile
Installation successful!
adrian@adrian-ubuntu-XPS:~$
adrian@adrian-ubuntu-XPS:~$
Once our Kubernetes is up, we can use the standard commands to install and deploy applications:
Creating a deployment:
kubectl create -f http://k8s.io/docs/tutorials/stateless-application/deployment.yaml
kubectl expose deployment nginx-deployment --type="LoadBalancer"
kubectl get svc
There is no special high availability feature supported by the Saltstack installer. Nevertheless instances created in the GCE cloud are part of an instance group. They will come back after being shut-down.
Using the default options, we got the following versions:
Master:
Kubernetes: 1.6.1
OS: Container-Optimized OS from Google
Kernel: 4.4.21+

Nodes:
OS: Debian GNU/Linux 7 (wheezy)
Kernel: 3.16.0-4-amd64
Using the GCE tools, you can change the number of instances in an instance group.
Without considering setting up the pre-requisites, the installation process took me few hours. This was due to additional configuration required, unexpected errors and above all, the time required to upload binaries into Google storage. There is no feedback about what the process is doing so you are likely to think the process is hung but it is actually uploading around 400MB in total to your cluster without giving you much information.
As expected the standard Google cloud expenses apply. In our example it will be $USD 182.71 per month including 1 master and 3 nodes.
I'm not a fan of this installation method. Regarding the pre-requisites, I found a bug in the documentation with few others running the gcloud commands. Later on, when I had to do the actual installation (curl -sS https://get.k8s.io | bash) I found a very flaky behaviour in general. Having to re-install some of the components or getting hidden failures. I left the previous command running when it clearly look hung and to my surprise I came back to meet a functioning Kubernetes. Sometimes life surprises you with a fully functioning Kubernetes and some battle scars.
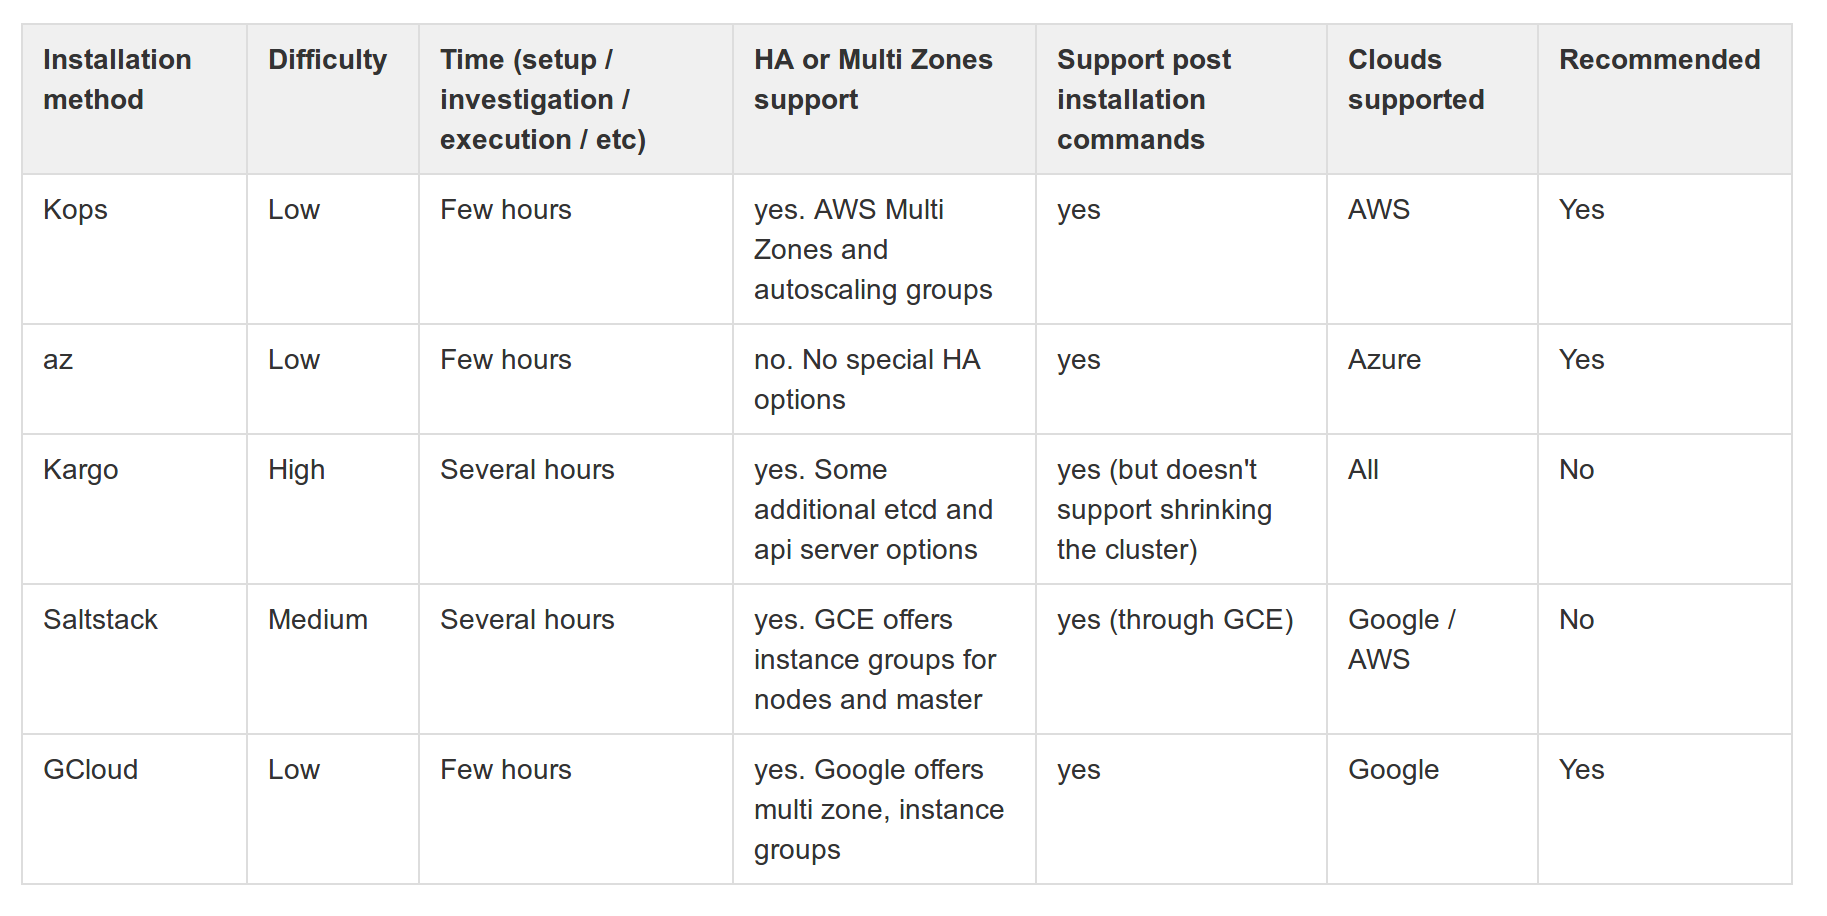
This is how every installation method stands against each other.
In this post we went through the most popular options to install Kubernetes in the cloud. Hope I saved you some time by giving you a user perspective of what is available out there and specially what are the trade offs.
As Lucas Käldström (Kubernetes maintainer) said, 'Kubernetes has not official installer..' there are instead a bunch of options, some better than others depending on our constraints. Nevertheless, despite having a complex configuration simplified for us, it is still important to understand the different components so as to get the best value from our cluster so maybe, after getting your cluster running you can work in getting Kubernetes installed but in the hard way ;) https://github.com/kelseyhightower/kubernetes-the-hard-way

Mariano Carpentier
Behrouz Hassanbeygi

Behrouz Hassanbeygi

Behrouz Hassanbeygi
Behrouz Hassanbeygi

Felix Schmitz
Address
Level 8
11-17 York Street
Sydney NSW 2000
Phone Number
+61 2 8294 8067
Email
[email protected]
By Mariano Carpentier
By Behrouz Hassanbeygi
© 2017-2026 Darumatic Pty Ltd. All Rights Reserved.